If Google led you here, you might already know what a low-content book is, but just in case, let’s be sure so we’re all on the same page.
According to Amazon’s Kindle Direct Publishing (KDP), “a low-content book has minimal or no content on the interior pages. Low-content books are generally repetitive, and designed to be filled in by the user.”
Think journals, notebooks, planners, calendars, and coloring books. You don’t write low-content books, you design them. And, you can self-publish them through KDP just like a book meant for actual reading.
After self-publishing two regular books through KDP, I consider myself an advocate for self-publishing as an alternative to going the traditional route. Each way has its pros and cons, of course, but I’ve found that many of the self-publishing pros outweigh the cons—for me.
READ MORE about self-publishing a regular book on Amazon.
For a time, I thought about self-publishing a coloring book, what with my art degree and all—and that is still a possibility—so color me surprised that my first low-content book through KDP is a notebook. Some might call it a journal. Either way, it’s not your average notebook; it’s for the note-taking doodler who loves Jesus.
Now that I’ve designed and published a low-content book on Amazon, I am happy to report that the process is not as intimidating as you might think. Keep reading for a step-by-step guide and a few pro tips.
Step-By-Step Tutorial on Creating a Low-Content Book
If you are itching to embark on this adventure, you likely already determined the type of low-content book you want to create. If not, start here, because the type of book you choose could influence the design stage. But first…
1. Determine the Dimensions and Number of Pages for Your Low-Content Book
Before you start designing, it helps to know your page dimensions. If you’re not sure:
- Gather up a few low-content books in your home or at a store near you.
- Consider which size you like best.
- Grab a tape measure if needed.
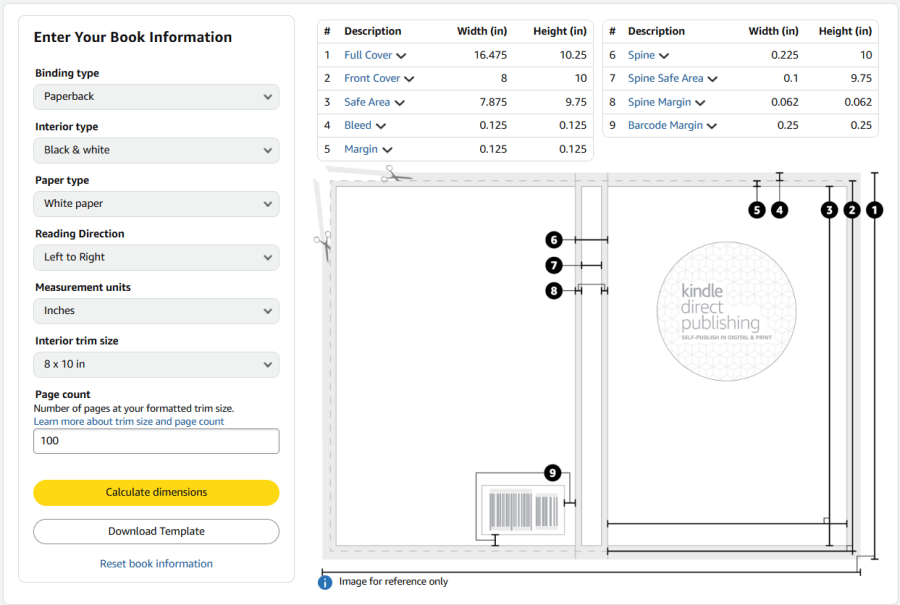
Once you settle on the size, use the KDP cover calculator to create a template that you can use to design your book cover and interior pages. In order to calculate your cover’s dimensions, you’ll need to input information about your book.
Below is an example of book information entered on the left, and the resulting template on the right. You can then download the template (bottom left button) and then proceed to Canva.

If you haven’t yet decided on the page count, not to worry. You can use this cover calculator as many times as you’d like and the page count will mainly determine the width of the book’s spine—which you will need when designing the final cover art.
2. Design Your Low-Content Book Cover with Canva
Personally, I love Canva. The free version is all you need to create your book’s cover (and interior pages), whether you design them from scratch or customize one of Canva’s MANY templates.
Going back to the KDP cover template above, you can see dimensions listed across the top right side. To create your cover, take the “Full Cover” width and height in inches and plug those numbers into Canva to create a custom size design. To do this:
- Click the “Create +” button in Canva (located on the top left of the desktop or laptop version)
- Change the “Units” to “in” for inches (it defaults to “px” for pixels)
- Input the “Full Cover” width and height from the KDP cover template
- Click “Create new design” to start your design

Once your blank design canvas is open, upload the KDP template into Canva and drop it into your design as a layer. You can then work on top of the template to create your cover and ensure that it fits within the safe area for printing. (Not sure what that means? Go back to the cover calculator page in KDP and hover over the terms across the top to find out.)

For the cover design, be sure to consider the front, back, and spine. If the spine is very thin, you may not have room for text, but be sure to at least add a background color that matches the front and back covers. And speaking of the back cover, you will see a barcode on the template. Anything you put there will be covered by the barcode, so I suggest leaving it a solid color.
When you are finished, delete the template layer(s) before downloading your final design. You can view all of the layers in your project by right-clicking the design, hovering over “Layer” in the menu, and then clicking on “Show layers.”
Note: This is not meant to be a full Canva tutorial. If you need help using Canva’s features, click the “Ask Canva” question mark at the bottom right of your screen or Google the type of Canva help you need and you’ll find plenty of YouTube videos.
After deleting the template layers, go ahead and download your cover design as a PDF. I choose “PDF Print” and also click the option to “Flatten PDF” because it works best for printing.
3. Design Your Interior Book Pages with Canva
This process is VERY similar to the cover design steps above, only the width of your custom Canva design will be different. You can still use the “Full Cover” height; however, for the width, you need to do a tiny bit of math.
Full Cover width (#1) – Spine (#6) = X
X ÷ 2 = width of interior book page
Take that calculated width and the Full Cover height and plug them into Canva’s custom size fields to create a new blank canvas for your pages. From there, you can add as many pages to that project as you like to design your book between the covers.
Once your internal pages are designed, download all the pages together as a PDF. Make sure all pages remain checked (which is the default setting in Canva), choose PDF Print, and Flatten PDF.
How to Set Up an Amazon KDP Account
If you already have an Amazon account, visit https://kdp.amazon.com/ and sign in with your existing account. Don’t have an Amazon account? Click “Sign up” and go through the prompts.
Starting a KDP account is free.
Once you log in, click “Your Account” at the top to get to your profile page. On this page, you’ll need to verify:
- Author / Publisher Information: Business type (individual or corporation), name, date of birth, and contact information
- Getting Paid: Sync up the financial account where you’d like to deposit the royalties
- Tax Information: Verify your individual or corporate tax information, which will then go through an approval process before you can get paid
Steps to Publish Your Book in KDP
After you’ve finished creating your book cover and pages in Canva AND your KDP account setup is complete, you’re ready to start the publishing process.
- Click “Bookshelf” in your KDP account. You’ll find it near the top next to the Kindle Direct Publishing logo.
- On the Bookshelf page, click the yellow “+ Create” button to get started.
- The next page will ask you to select which type of book you’re creating. In this case, you will either choose a paperback or hardcover book.
- From here, you will need to complete three separate pages with details about your book:
- Details page — book title, description, etc.
- Content page — upload the PDFs you create and preview them
- Rights & Pricing page — set a price for your book and confirm where you want Amazon to sell it
Once you complete these pages and submit your book, it will go into review. For a regular book, the review process can take up to 72 hours; but for a low-content book it can take up to 10 business days. Here’s a look at the message I received after submitting my book.

You will receive an email from Amazon KDP when your book is approved. Or, on the off-chance it is not approved, you will also receive an email. (The very first book I published on KDP was initially rejected due to a formatting error, and once I fixed it, it went through review again and was approved.)
And there you have it. How to self-publish your low-content book on KDP.
FAQs about Publishing a Low-Content Book on KDP
Right now, you might have a few lingering questions. Below were a few of mine at the beginning. If I don’t cover your question here, feel free to comment and ask away.
Do you need a copyright page for a low-content book?
Technically, no. I did include one on mine because it is my design after all. I won’t get into the legalities of copyrighting here, though. If you are interested in better understanding copyright laws and self-publishing, I encourage you to do your research.
But, the short answer here is, you likely do not NEED a copyright page for a low-content book.
Can you make a low-content eBook on KDP?
Sadly, the answer is no, though I do understand because not all e-readers are equipped to work with a stylus.
Can you create a spiral bound book on KDP?
Also no. This was almost a deal-breaker for me, but then I remembered that I am personally not a fan of most spiral notebooks, and I went the paperback route for my notebook.
Does Amazon generate a preview of the inside pages of a low-content book?
I wish, but no. That is one downside of publishing a low-content book directly through Amazon. There is no inside preview and authors are not able to add additional photos.
KDP eBooks do generate a preview, but, as I answered above, you can’t create a low-content eBook through KDP.
Still, even with the downsides, the fact that you can create your very own book and self-publish it on Amazon in a matter of days is pretty incredible.
I hope this has inspired you to give it a go!

